Mini-Split Installation in Park City & the Wasatch Back: A Team Cheever Perspective
Mini-Split Installation in Park City & the Wasatch Back: A Team Cheever Perspective
Park City’s mountain climate presents unique heating and cooling challenges – from high-altitude performance issues to frigid winters and daily temperature swings. As a local Team Cheever Plumbing & Heating crew, we have extensive experience installing ductless mini-split heat pumps across Park City and the Wasatch Back. In this guide, we share professional insights on why mini-splits are often the best HVAC for Park City winters, and how to choose and install the right system for our high-altitude environment. We’ll cover everything from cold-climate considerations and installation best practices to indoor air quality benefits and maintenance tips. Whether you’re planning a mini-split installation in Park City or upgrading to a ductless heat pump in the Wasatch Back, read on to learn how to achieve efficient, year-round comfort in the mountains.
High-Altitude and Cold-Climate Considerations
Park City sits around 7,000 feet elevation, which has a real impact on HVAC systems. Thinner air at high altitude means heat pumps have to work harder to absorb and release heat. In fact, the reduced air density derates a heat pump’s capacity – essentially reducing its heating output at altitude. Proper sizing is critical: a unit that’s marginal at sea level might underperform in Park City’s thin air. It’s recommended to slightly oversize or choose models specifically rated for high elevations to ensure you still get adequate BTUs of heating on the coldest days. Park City’s elevation of over 7,000 feet can affect your HVAC performance. Proper sizing of your HVAC unit and correct installation are crucial for optimal performance at high altitudes. Our Team Cheever experts always factor in altitude during load calculations, often using a rule of thumb that capacity can drop roughly 3–4% per 1,000 ft of elevation.
Extreme winter cold is another challenge. Park City and the Wasatch Back see winter lows well below freezing (design temps near 0 °F or even below). Not all heat pumps are built alike for such conditions. Cold-climate mini-splits are specifically engineered to handle frigid temperatures. Modern units can “deliver up to 100% rated heating capacity at 5°F and around 76% capacity at -13°F” – a huge improvement over older heat pumps. In other words, even when it’s 5 degrees outside, the right mini-split will still provide its full heat output, and it won’t quit when the mercury really plummets. Key features to look for include enhanced compressors, inverter technology, and in many cases built-in base pan heaters to prevent ice buildup in the outdoor unit (for example, “some systems come with a drain pan heater already installed” to melt snow/ice in the unit). These cold-climate models maintain higher efficiency in low temperatures as well – some boast a COP over 3 at 5°F (meaning they produce 3× more heat energy than they consume in electricity even at that cold point). For homeowners, this means reliable heat without huge utility bills, even during a Park City cold snap.
Best practices for high-altitude, cold-weather installations start with selecting the right equipment. Opt for “hyper-heat” or low-ambient mini-split models from reputable brands (more on brands in our FAQ). We often design systems with a bit of extra capacity to account for altitude derating and ensure a little headroom for subzero nights. It’s also wise to plan for defrost cycles – all heat pumps must defrost periodically in freezing weather, so we install units with proper clearance and often on wall brackets or raised pads about 18-24″ off the ground to keep them above snow drifts. Additionally, many Park City homes are used as vacation properties or sit unoccupied for stretches (more on that below). For those, we recommend mini-splits that have a freeze protection mode (often called 50°F or 46°F “FP mode”) which runs the heat at a very low setting to prevent pipes and interiors from freezing while using minimal energy. In short, cold-climate ductless heat pumps paired with altitude-aware design give our local homeowners year-round comfort and peace of mind, despite the harsh climate.
Top Reasons to Install a Mini-Split
Why are so many Park City and Wasatch Back homeowners turning to ductless mini-splits? From historic miner’s cabins to modern ski chalets, these systems offer versatile solutions that traditional HVAC can’t easily match. Here are the most common scenarios where a mini-split shines:
- New Construction: Building a new home in the mountains is the perfect opportunity to incorporate energy-efficient technology from the start. Mini-splits in new constructions allow HVAC designers to “incorporate modern, energy-saving technologies right from the start, reducing long-term energy costs.”  Instead of a bulky furnace and ducts, a ductless system can provide discrete climate control with a smaller footprint. They’re also great for green building or net-zero homes, thanks to their high efficiency and ability to zone by room. In Park City’s luxury market, we see many new homes opting for radiant floor heat supplemented by mini-split AC, or full multi-zone mini-split systems, to avoid ductwork and maximize architectural freedom.
- Home Additions & Remodeling: When you’re adding a new extension, finishing a basement, or remodeling an older space, connecting it to your existing central HVAC can be difficult or expensive. Running new ductwork through thick log walls or retrofitting an old Victorian for ducts can be a “costly and invasive construction project, potentially disrupting the home’s original architecture and aesthetics.” Mini-splits offer a simpler solution: no ducts needed. You can give that new master suite or remodeled kitchen its own climate control without tearing into walls elsewhere. When remodeling areas like basements or garages or adding an addition, a mini-split system can be an effective solution…extending ductwork from your central HVAC can be costly and require extensive modifications. By going ductless, you heat/cool only the new space and avoid overloading your old furnace or AC. This targeted approach often costs less than upgrading the whole-house system, and it keeps the comfort consistent – that new sunroom will be cozy in winter and cool in summer, no matter what the rest of the house is doing.
- Retrofitting Older Homes: Many homes in Park City’s historic areas (and other Wasatch Back communities) were built without modern HVAC. They might rely on baseboard heaters, wood stoves, or outdated systems, and adding central air can be a nightmare due to the lack of existing ducts. Mini-splits are ideal for retrofitting in these cases. Because “they don’t rely on ducts, they offer a less intrusive option for providing modern heating and cooling without altering the home’s structure”. Team Cheever installers can mount slim indoor units on walls or ceilings with minimal disturbance to plaster or log interiors. The refrigerant lines only require a small hole to connect to the outside unit, preserving the charm of an older home. This way, even a 120-year-old miner’s cottage can enjoy silent air conditioning in summer and efficient electric heating in winter, all without a major renovation. We carefully plan indoor unit locations to keep them discreet (for example, above a doorway or in a corner) to maintain the home’s aesthetics while vastly improving comfort.
- Supplementing & Zoning Existing Systems: Perhaps you already have a central furnace or boiler, but there are “certain rooms that tend to overheat or feel chilly” – a common complaint in larger or multi-level homes. Maybe that upstairs bedroom is always hot, or the basement game room is perpetually cold. Instead of cranking the whole-house thermostat and wasting energy, a mini-split can target the trouble spot. Homeowners use ductless units to “treat a new space as its own zone… you can turn down the temperature in a workout area without affecting the rest of your home”. For example, install a single-zone mini-split in the master bedroom so you can keep it a cool 65°F at night for better sleep, while your main furnace runs minimally. Or use a mini-split in a rarely used guest casita – keep it off most of the time and just heat/cool that space on demand when occupied. This zone control capability not only improves comfort, it saves money by avoiding conditioning rooms that aren’t in use. It’s also a great solution for vacation homes: you might maintain a low baseline temperature via a central system to protect the whole house, but use mini-splits to boost comfort quickly in main living areas when you arrive for a weekend.
- Energy Efficiency Upgrades: Mini-splits are among the most efficient HVAC options available. Homeowners looking to reduce utility bills and their carbon footprint can significantly benefit from these systems. By installing a high-SEER heat pump, you could “save on energy bills by only heating or cooling the spaces that are in use”  . Ductless systems eliminate the losses from leaky ductwork – which can account for up to 20% heat loss in forced-air systems. Plus, their inverter-driven compressors modulate gently, avoiding the energy spikes of traditional on/off cycling. Upgrading an old electric baseboard or an oversized AC to a mini-split can often cut energy usage by 30% or more. And since one heat pump provides both heating and cooling, you’re effectively consolidating two systems into one efficient package. For Park City folks aiming for eco-friendly homes (perhaps to take advantage of solar panels or Rocky Mountain Power’s incentives), ductless heat pumps are a cornerstone of achieving that goal. In short, mini-splits enhance your home’s energy efficiency and comfort at the same time, making them a smart upgrade in our region.
Technical Aspects of Mini-Splits Explained
Installing a mini-split is not just about picking a BTU size; savvy homeowners will encounter a range of technical ratings and system configurations. Below, we break down some key technical terms and options – SEER, HSPF, cold-climate models, single vs. multi-zone setups, and smart controls – to help you make an informed decision.
SEER and HSPF: Efficiency Ratings
SEER (Seasonal Energy Efficiency Ratio) and HSPF (Heating Seasonal Performance Factor) are two important numbers you’ll see on any heat pump. These ratings measure the overall efficiency of the unit over an entire cooling or heating season, respectively. In simple terms, SEER tells you how efficiently the system cools (like a car’s MPG for summer), and HSPF tells you how efficiently it heats over winter.
- SEER: This rating is calculated by dividing the total cooling output (in BTUs) by the total electricity consumed (in watt-hours) over a typical cooling season. A higher SEER means more cooling for less electricity. “At its core, a SEER rating is a comparative number that reflects how much electricity a unit consumes relative to its BTU output…a higher SEER rating always identifies a more efficient air conditioner.” For example, upgrading from a 10 SEER to a 20 SEER system roughly doubles the efficiency (20 SEER is about 50% less energy use than 10 SEER for the same cooling). Modern mini-splits often achieve SEER ratings in the high 20s or even 30s, far above the 13–14 SEER minimum of older units. (Note: as of 2023, SEER2 is the updated standard with slightly adjusted values, but the concept is the same).
- HSPF: This rating applies when the heat pump is in heating mode. It’s the ratio of total heat output (BTUs) to total energy used (watt-hours) over the heating season. Again, higher HSPF = greater heating efficiency. “HSPF…is an industry-wide accepted measure of the efficiency of air-source heat pumps”  and “a higher HSPF rating identifies a more efficient unit.” An older heat pump might have an HSPF of 7 or 8, whereas today’s cold-climate models often boast HSPF ratings of 10–12 or more (meaning they can deliver 10+ BTUs of heat for every 1 BTU of electricity consumed over the season). Keep in mind that heat pump efficiency does drop in extreme cold, so the real-world performance in Park City might be a bit lower than the nameplate HSPF if we have a long stretch of sub-freezing days. Still, HSPF is a good comparative metric – and anything designated as a Cold Climate Heat Pump will typically have a high HSPF and proven performance at low temperatures. When shopping, aim for high SEER and HSPF values; they indicate a better-designed system that will save energy and money over time.
Cold-Climate Heat Pump Models
Not all mini-splits are created equal – especially when it comes to heating in cold weather. Cold-climate heat pumps are a special breed optimized for low outdoor temperatures. They use advanced compressors, larger heat exchangers, and control algorithms that allow them to squeeze heat from the air even when it’s extremely cold outside. In our mountain environment, it’s worth investing in one of these models. As mentioned, some can provide full heating capacity down to 5 °F, which covers the vast majority of winter days here. Even at -13 °F (which is lower than Park City’s typical lows), a quality cold-climate unit might still put out ~75% of its rated heat – whereas a standard heat pump might give up or need heavy electric resistance backup well before that point.
What brands or features should you look for? Many top manufacturers have cold-climate lines. For example, Mitsubishi’s Hyper-Heating (H2i) series, Fujitsu’s XLTH (Extra Low Temperature Heating) models, and Daikin’s cold-weather series are all designed for places like Utah. Mitsubishi is widely regarded as a pioneer in this space, with “a wide range of mini-split heat pump models to choose from” and a reputation for reliable operation in frigid climates . Some Mitsubishi units even include an electric heating element to give a little extra boost during startup or extreme cold (though most of the time, the heat pump itself suffices). LG also has the Red Series which, for instance, “continues to function at maximum capacity all the way down to -5°F” and comes with built-in base pan heaters to handle snow and ice. Fujitsu and Daikin offer units with some of the highest efficiencies in the industry and solid cold weather performance as well .
When discussing options with your installer, make sure to specify that you need a cold-climate heat pump – the unit’s specifications will list a minimum operating temperature (look for something like “100% at 5°F” or an indicated operation down to -15°F). Choosing one of these models may be slightly more expensive upfront, but it’s crucial for Park City winters. They will minimize or eliminate the need for backup heat. In fact, in many cases we integrate mini-splits with existing heating systems in a hybrid setup (e.g., your furnace only kicks on if the heat pump can’t keep up). But with the latest units, that transition is rarely needed because the heat pump can handle the load in all but the most extreme cold. The bottom line: select a mini-split model rated for cold climates – it will pay off in performance and efficiency when you need it most.
Single-Zone vs. Multi-Zone Systems
Ductless mini-splits come in two basic configurations: single-zone (one outdoor compressor unit paired with one indoor unit) or multi-zone (one outdoor unit connected to multiple indoor units). Deciding between them depends on your home’s layout and your goals for zoning.
- Single-Zone Systems: These are ideal when you have one specific area that needs heating/cooling – for example, a studio, a single room addition, or an open-concept main floor. A single-zone mini-split typically has one outdoor condenser dedicated to one indoor air handler. The advantage is that the system is perfectly sized and optimized for that one space, often resulting in very high efficiency and performance. Installation is straightforward with just one refrigerant line pair to run. Single-zones are also very responsive – when that room calls for heat, the entire compressor’s capacity is focused on it. Many single-zone units can modulate down to extremely low speeds as well, leading to great efficiency at partial load. If your needs are simple (say, just cooling a master bedroom), single-zone units are cost-effective and easy to add. Even larger homes might use multiple single-zone systems in different areas rather than one tied-together multi-zone, depending on the design.
- Multi-Zone Systems: These systems use one larger outdoor unit that can attach to several indoor units (heads) – often 2 to 5 zones, and in some cases up to 8. Each indoor unit can be a wall-mounted blower, a ducted mini-air handler, or other styles, and you can mix-and-match types in many systems. Multi-zones shine when you want to provide comfort to multiple rooms or an entire house with a single integrated system. Instead of having 4 outdoor compressors for 4 rooms, you’d have one beefier outdoor unit linked to 4 indoor units. This is aesthetically more pleasing outside (one unit instead of many) and can be space-saving. Inside, you still get independent control of each zone’s temperature. For example, a 4-zone system could serve the living room, kitchen, and two bedrooms, each with its own wall unit and remote. Do note that the outdoor unit’s capacity is shared – it will ramp up or down to meet the combined demand of all operating zones. Sophisticated multi-splits can balance the cooling/heating output among rooms as needed. One consideration: if your home has very different load sizes in each room, a multi-zone system must be sized to the total load, which can sometimes lead to a slightly oversized condition if only one zone is running. However, newer inverter-driven systems handle this by modulating output very well. Our Team Cheever designers carefully calculate each zone’s needs and select a multi-zone unit that can accommodate simultaneous extreme needs (like all zones calling on a very hot day) without overpowering when only one zone is active. Multi-zone systems are excellent for whole-home solutions, renovations where ductless is replacing a central system, or any scenario where you want one cohesive system for several areas.
In summary, single-zone mini-splits are simple and ultra-efficient for spot conditioning, whereas multi-zone setups offer a flexible, consolidated approach to whole-home climate control. Often, budget and existing infrastructure play a role too – it might be cheaper to do one outdoor unit than install multiple, but very large multi-zone units can get pricey. We often discuss both options with clients. In Park City’s luxury homes, we’ve installed multiple single-zones strategically (for absolute maximum efficiency and redundancy). In other cases, a single 5-zone unit was the best balance of cost and convenience. Consult with a professional to map out your home’s zones and decide the optimal configuration. Either way, ductless systems will deliver comfortable, zoned heating and cooling without ducts.
Smart Thermostats and Controls
Modern mini-split systems come with more than just an infrared remote control. Many include advanced smart controls that make it easy to manage your comfort and even save energy. When we install mini-splits, we often integrate them with smart home systems or at least demonstrate the built-in smart features to homeowners.
Many ductless heat pumps now have built-in Wi-Fi connectivity. This allows you to use a smartphone app to control the units from anywhere. For example, if you’re away in Salt Lake City and have a renter checking into your Park City condo, you could remotely pre-heat the living area or verify that the system is in an energy-saving mode. Homeowners can easily adjust settings from anywhere using mobile apps…monitor and modify temperatures while at work or on vacation and receive maintenance alerts. This kind of remote access is perfect for vacation homes or rental properties (as we’ll discuss in the FAQ) – you have peace of mind and control even when off-site.
Smart controls also enable scheduling and automation. You can set up daily programs, like having the bedroom unit turn off during the day and back on an hour before bedtime, or scheduling the system to lower to 60°F at night and back to 68°F in the morning for the main living spaces. Rather than remembering to fiddle with each unit, you let the software handle it. This “aligns with your family’s routine and reduces energy use when nobody is home” . Some mini-split apps even use geofencing – they can detect when your phone is approaching home and kick on the AC, for instance.
Additionally, certain models integrate with voice assistants (Alexa, Google Assistant, etc.) or smart thermostats. For example, Mitsubishi offers a module (Kumo Cloud) that ties into Alexa for voice commands. There are also third-party smart thermostat devices (like Cielo Breeze or Sensibo) specifically made for ductless units, which can give you thermostat-like control and voice activation if your unit’s brand app doesn’t support it directly. “Some systems even feature voice-activated controls, providing an additional layer of ease in managing your home’s climate.” .
One question we often get is whether you can use a Nest or Ecobee thermostat with a mini-split. Directly, no – most mini-splits use their own control protocols, not the 24V wiring that Nest thermostats are designed for. However, with an interface module or a smart controller as mentioned, you can achieve similar centralized control. The trend in the industry is moving toward app-based control for each indoor unit, rather than a wall thermostat, since each unit has its own sensor. For multi-zone systems, you’ll control each zone independently (either with multiple thermostats or a consolidated app).
Finally, smart controls can provide maintenance alerts and data. Your system might alert you if it senses a fault, or remind you to clean filters if hours of operation exceed a limit. Some apps show energy usage stats so you can track how much electricity your heat pump is using and optimize settings. At Team Cheever, we encourage homeowners to utilize these smart features – they can boost your system’s efficiency and lifespan by ensuring it’s used properly. In a nutshell, mini-splits pair very well with smart home tech: you get convenient, granular control and the ability to optimize comfort room-by-room, which is a big selling point in today’s connected world.
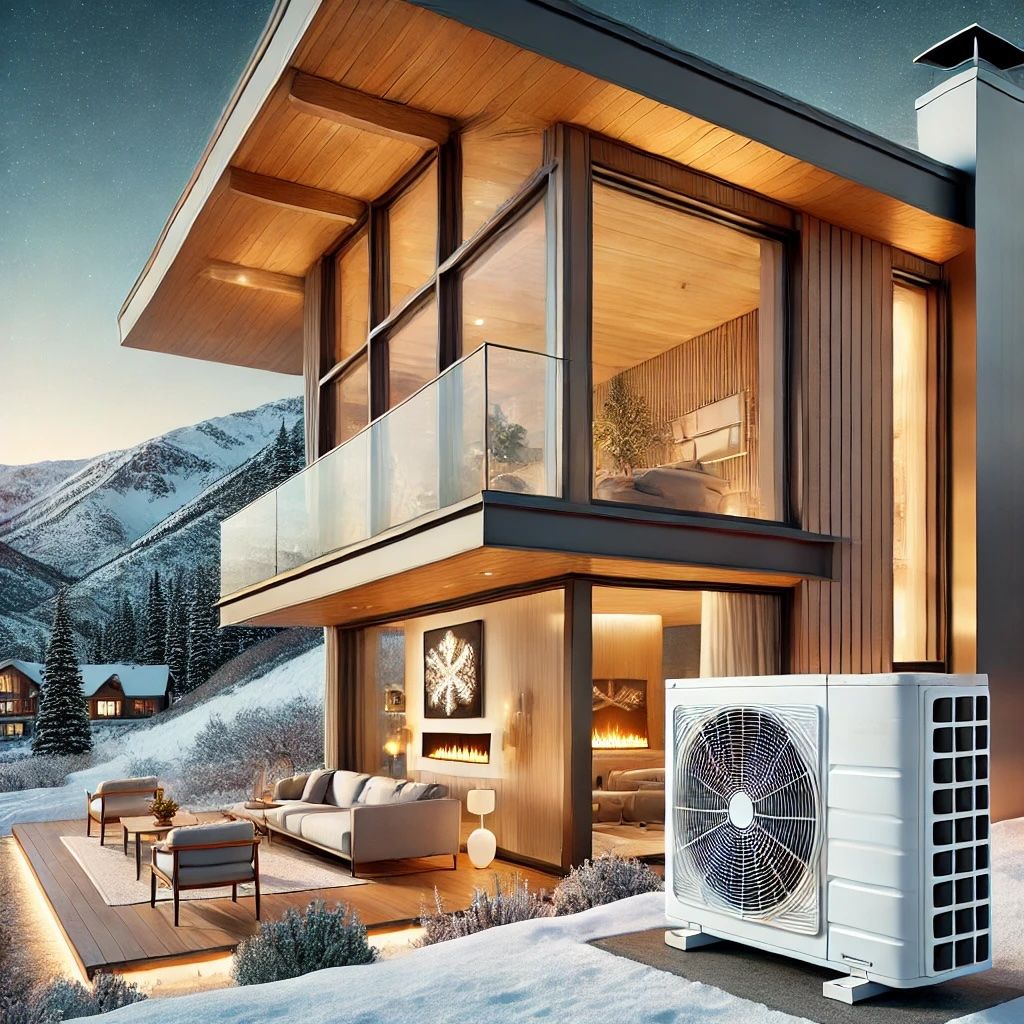
A Mitsubishi ductless outdoor unit installed on a sturdy stand outside a Park City home. Note the elevated placement – keeping the unit off the ground protects it from snow buildup in winter. The refrigerant line and electrical connections run neatly along the wall into the house (hidden by the shrubs in this image). Professional installation ensures the unit is level, secured, and all connections are weather-tight.  
The Mini-Split Installation Process
Installing a mini-split heat pump is a precise process that should follow manufacturer guidelines and local codes. While the concept (mount indoor unit, drill hole, connect to outdoor unit) sounds simple, proper installation is crucial for performance and longevity. Here’s an overview of how Team Cheever approaches mini-split installations, highlighting key considerations for indoor unit placement, outdoor unit setup, refrigerant lines, and electrical work.
- Indoor Unit Placement: We start with a thorough assessment of the room(s) to determine the best location for the indoor air handler(s). Ideally, an indoor unit should be mounted high on an exterior wall, near the ceiling, where it can circulate air throughout the space. Placement is chosen to avoid obstructions – you don’t want it blowing directly at a seating area or being blocked by tall furniture. Our installer will locate wall studs and attach a metal mounting bracket securely to support the unit . We also consider aesthetic concerns (centering the unit or placing it above a doorway) and functionality (away from heat sources or electronics that could skew the temperature sensing). Importantly, we ensure the indoor unit is *“centrally located and away from any existing thermostats” to prevent interference between systems . Once the spot is finalized, a small 3-inch hole is drilled through the exterior wall behind the unit . This hole will carry the refrigerant lines, condensate drain tube, and power/control cable to the outside. After mounting the indoor unit flush and level on its bracket, the installer feeds the copper refrigerant pipes (pre-insulated), drain line, and wires through the wall to the outside.
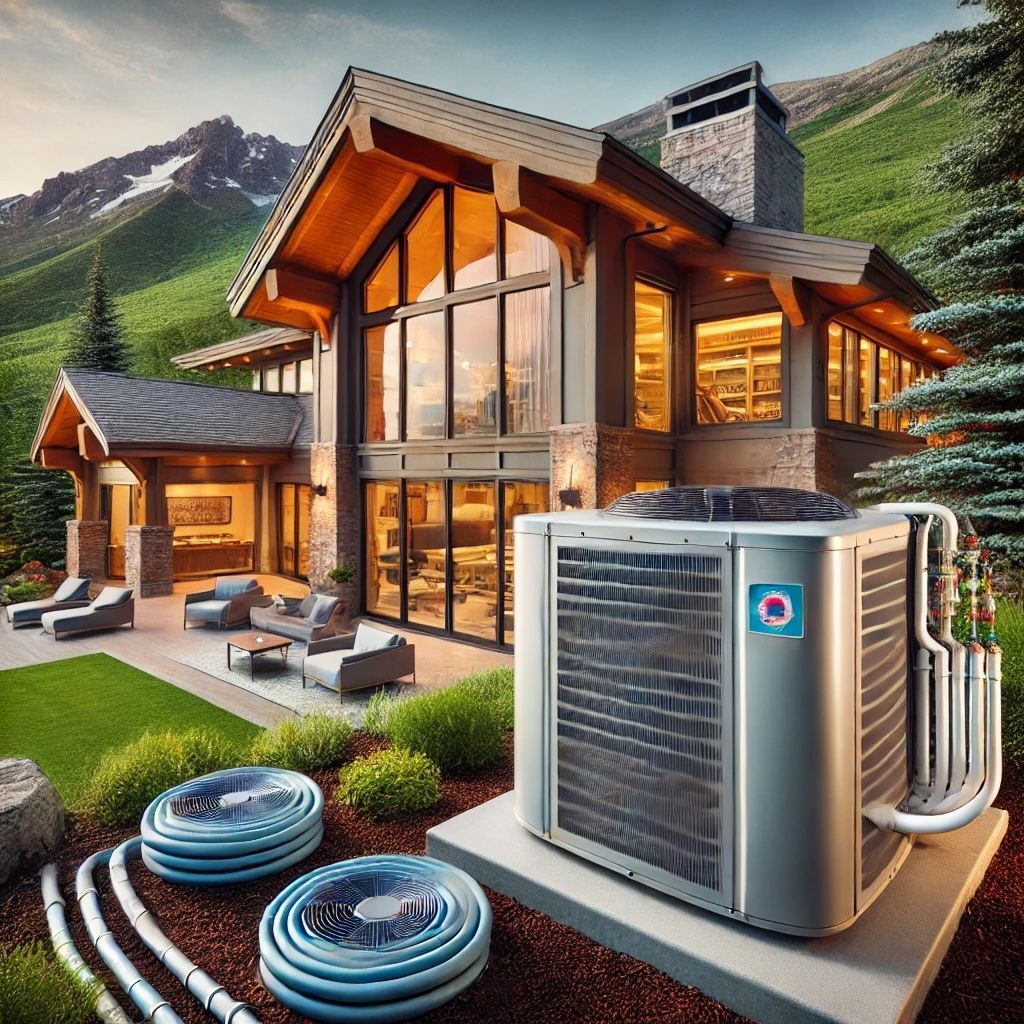
- Outdoor Unit Placement: The exterior condenser unit (compressor) needs a suitable spot on the outside of your home. We look for a location close to the indoor unit (to minimize line length) and with enough clearance for airflow and service access. Typically, we place the outdoor unit on a concrete pad or wall brackets. It must be on a stable, level surface and away from areas of heavy snow drift or runoff . In Park City, that often means mounting it a foot or two above the ground (either on a pad with risers or bolted to the foundation wall) to keep it above snowfall accumulations . We also avoid positioning under roof drip lines without a gutter, to prevent icicles or meltwater from dropping onto the unit. Once set in place, the outdoor unit is anchored – either bolted down to prevent movement/vibration. We leave the recommended clearances (usually about 12–24″ from the wall and at least 4–6 feet clearance in front of the unit) so it can breathe freely. The spot should be accessible for maintenance but not in the way of foot traffic or where snow from snow-blowing might cover it. We’ve found a discreet side-yard location or behind shrubs works well, as long as those shrubs won’t encroach on the unit (trimming them seasonally is wise). After mounting, we connect the refrigerant line set and wiring coming from the indoor unit to the outdoor unit’s service valves and electrical terminals. These connections are critical to get right – our certified technicians use a vacuum pump to evacuate the lines and then open the valves to release refrigerant, ensuring correct refrigerant charge and no leaks.
- Refrigerant Lines and Drainage: The copper lines carrying refrigerant between the indoor and outdoor units are the lifeblood of the mini-split. We take care to route these lines neatly and protect them. After running them through the wall hole, the lines are often enclosed in a PVC line-hide channel on the exterior wall for a clean look (you can even get these in colors or paint them to match the siding). The lines are insulated to prevent energy loss and condensation. All joints are flare connections or brazed per manufacturer spec, and we pressure-test them before releasing refrigerant. Alongside the refrigerant lines, the condensate drain hose from the indoor unit is routed out. In cooling mode, the indoor unit will produce condensation (just like a cold drink sweating in summer). We ensure this flexible drain line has a downward slope to drain properly outside the house. In winter heating mode, most mini-splits will not produce indoor condensate (since they are not dehumidifying then), but they will produce condensate at the outdoor unit during defrost cycles. That’s why outdoor units have drain holes in the base and, for cold climates, often a heater in the pan. During installation, we make sure those drain ports are clear. In some cases, we attach an auxiliary drain line or pan to channel defrost water away if it could cause icing on a walkway, for example. Every penetration through the wall (refrigerant lines, drain, cable) is sealed with foam or caulking from both sides to keep weather and critters out.
- Electrical Requirements: Mini-splits involve both high-voltage and low-voltage electrical work. The outdoor condenser needs a dedicated power circuit from your electrical panel. Typically, small 9,000–12,000 BTU units might run on 110/120V, but most larger or multi-zone systems use 208/240V. As licensed contractors, Team Cheever will either perform the wiring or coordinate with a licensed electrician to run the appropriate gauge cable and install a disconnect. The National Electrical Code requires a shutoff/disconnect box near the outdoor unit – we mount this on the exterior wall within line-of-sight of the unit. This allows the unit to be safely powered down during service or emergencies. From that disconnect, an electrical whip (conduit) connects to the condenser. We also run a communication cable (usually 14-4 or 16-4) between the outdoor and indoor unit – this carries control signals and sometimes power to the indoor unit. One advantage of most mini-splits is that the indoor unit is powered by the outdoor unit, so you don’t typically need a separate circuit indoors (exceptions are some ceiling cassettes or ducted units that might use a 120V feed). We size the circuit breaker and wire according to the unit’s specifications (e.g., a 24,000 BTU might need a 20 Amp 240V circuit). Proper electrical work is essential for safety and proper function – insufficient wiring can lead to voltage drops or tripped breakers. “Ductless mini splits should have their own dedicated circuit…a dedicated circuit is one that has its own breaker, preventing overloads”. Once wiring is complete, we double-check all connections and adhere to all grounding requirements.
- Professional Commissioning: After the physical installation and wiring is done, our team carefully commissions (starts up and tests) the system. We use a vacuum pump and manifold gauges to evacuate air and moisture from the refrigerant lines before releasing the factory charge of refrigerant into the system – a critical step for performance and longevity. We then turn on power and run the mini-split in both cooling and heating modes to verify it’s working correctly. This includes checking the refrigerant pressure levels, measuring the temperature drop/rise across the indoor coil, and ensuring the unit responds to the controls properly. We also listen for any unusual noises or vibrations and check that the condensate is draining as expected. At this stage, we’ll adjust airflow direction vanes, show you how to clean the filter, and verify that things like Wi-Fi control (if applicable) are connecting. A proper commissioning ensures the unit will operate at peak efficiency from day one and that you, the homeowner, are satisfied with the result. We’ll also walk you through how to use the remote or wall controller. Professional installation may cost more than a DIY attempt, but it protects your investment – not only making sure the placement, refrigerant charge, and electrical hookups are spot on, but also typically extending the life of the unit by preventing mistakes. (And it maintains the manufacturer’s warranty, which often requires licensed installation.)
In summary, a mini-split installation in Park City’s climate must be done with care and expertise. We account for altitude and weather at every step: sealing and insulating lines, positioning equipment above snow, and verifying performance. The result is a system that “fires off” smoothly and safely, ready to deliver efficient comfort. Always use qualified HVAC professionals for this process – our Team Cheever crew has the specialized training (including EPA refrigeration certification and electrical knowledge) to do the job right. A well-installed mini-split will look neat, run quietly, and function reliably for decades to come.
Indoor Air Quality Benefits of Mini-Splits
Beyond just heating and cooling, mini-splits can also contribute to a healthier indoor environment – an important consideration for those with allergies or who want overall better indoor air quality (IAQ). Here are some ways ductless systems can improve the air you breathe at home:
- No Ductwork = Cleaner Air: Traditional forced-air HVAC systems rely on ducts that can harbor dust, mold, and allergens over time. If ducts are not regularly cleaned, they may circulate those particles throughout the house. Ductless mini-splits, as the name implies, have no ducts – each indoor unit treats the air in its own zone and sends it directly into the room. This inherently means there is no opportunity for dust to accumulate in hidden passages. You avoid the issue of ductwork “blowing” dust every time the system kicks on. As one expert notes, “unlike traditional HVAC systems that rely on ductwork which can accumulate and distribute allergens like dust and mildew, mini-splits eliminate this risk by operating without ducts.” For our dry and sometimes dusty climate, this is a big plus.
- Advanced Filtration: Each indoor air handler of a mini-split comes equipped with an air filter – typically a washable mesh filter that catches dust and debris. Many models also offer optional high-efficiency filters or multi-stage filtration. For instance, some Mitsubishi and Daikin units have enzyme-based or electrostatic filters that can capture finer particles, and some include activated carbon to absorb odors. While these filters are not HEPA, they significantly improve the air quality in the serviced room by continuously filtering the circulated air. Over the course of a day, a mini-split might run air through its filters dozens of times, gradually reducing particulate levels. “Indoor air handlers in mini-split systems are equipped with advanced filtration systems designed to capture dust, pollen, and other particles, preventing them from circulating in your living spaces.” . This is a boon for allergy sufferers – many of our clients report that after installing ductless units, they notice less dust settling on furniture and experience fewer allergy symptoms because the filters are trapping a lot of it. Just remember to clean those filters as recommended (usually monthly) to keep the airflow and filtration effective.
- Humidity Control: Air conditioning in general helps with humidity control, and mini-splits are particularly good at dehumidifying in summer. Because they modulate their speed, they often run for longer cycles at lower power, which lets them remove more moisture from the air (longer run times = more moisture condensing on coils). In cooling mode, the indoor unit’s coil gets cold and water condenses out, draining away – this lowers the indoor humidity. Many mini-splits also feature a “Dry” mode, which maximizes dehumidification if needed (the unit runs at a low fan speed with the compressor cycling to pull moisture without over-cooling). Keeping indoor humidity in the ideal range (around 30-50%) not only makes it feel more comfortable, it also inhibits mold growth and dust mite populations (both of which thrive in high humidity). In Park City, extremely high humidity is not usually an issue, but during our monsoon season or when it’s raining in summer, it can creep up. The mini-split will automatically dehumidify as it cools, helping maintain comfort. In winter, our air is very dry – a heat pump won’t add humidity (like a humidifier would), but importantly it also doesn’t overly dry out the air the way a gas furnace might (combustion heating can reduce relative humidity more). If humidity control is a concern, we can integrate a separate humidifier or dehumidifier, but for most, the mini-split keeps a good balance.
- Reduced Allergen Spread: With zoned mini-splits, you can confine pollutants or allergens to specific areas more easily than with a whole-house system. For example, if you burn a piece of toast in the kitchen, a ductless unit in the kitchen will filter the smoke from that area and not spread it to bedrooms (as might happen if central AC pulled it into return ducts). Similarly, if someone in one bedroom has pets or is sick, their dedicated unit filters their room’s air without mixing it through the entire home’s duct network. This compartmentalization can improve overall hygiene and comfort for residents.
- Fresh Air Integration: While standard mini-split systems recirculate indoor air (cooling or heating it), some systems allow for integration of fresh air or have specific ventilator add-ons. This can help bring in outside air in a controlled manner, improving ventilation in tight homes. Even without that, many homeowners find they can crack a window occasionally for fresh air and the mini-split will compensate without huge energy penalties, thanks to its variable-speed efficiency.
In conclusion, mini-splits not only make your home more comfortable temperature-wise, they also promote cleaner and healthier air. With no dirty ducts, continuous filtering, and active dehumidification, these systems tend to reduce allergens and pollutants in your living spaces. Just be sure to maintain the filters and keep the units clean (more on that next). For those with asthma or allergies in our dry mountain climate, the improvement in air quality is a significant and sometimes overlooked benefit of going ductless.
Maintenance and Lifespan in Park City’s Climate
One of the great things about mini-split systems is their longevity – but to reach that 15-20 year lifespan, a bit of routine maintenance is needed. Both homeowners and professionals have roles to play in keeping a ductless heat pump running efficiently. Here’s what to expect in terms of maintenance and lifespan for mini-splits in Park City (and similar high-altitude, cold climates):
Regular Maintenance Tasks: Fortunately, mini-splits are relatively low-maintenance compared to, say, a combustion furnace. The number one task is cleaning the indoor unit’s air filters. These filters capture dust to protect the blower and coil, and they can fill up surprisingly fast (especially in homes with pets or if construction dust is present). We advise checking filters monthly and cleaning them (usually just vacuum or rinse out) when needed . A dirty filter will reduce airflow, hurting efficiency and performance. Besides filters, every few months it’s good for homeowners to visually inspect the outdoor unit – make sure it’s not blocked by leaves, snow, or debris. In winter, if heavy snow has piled up, carefully clear around the unit so it can breathe and drain freely. After a big snowstorm, ensure the fans and coils are not covered in snow or ice. Most units handle snow on their own (especially if raised), but blowing snow can sometimes accumulate inside – if you notice excessive ice, call a pro to safely clear it and check the defrost function.
Professional Servicing: Just like a car, a heat pump should get a “tune-up.” We recommend a yearly maintenance visit, ideally each fall before the heating season (some choose to do it twice a year – spring and fall – which is great, but at least once annually is wise). During a professional maintenance service, our technician will do things like:
Inspect and clean the indoor coil and blower wheel – over time, fine dust can bypass the filter and cling to the coil. We’ll remove the cover and gently clean these components, which maintains airflow and heat exchange efficiency.
Check the refrigerant pressures and look for any signs of leakage – ensuring the system is properly charged. (Refrigerant should not leak under normal conditions – if it’s low, there’s a leak to fix.)
Verify electrical connections – tightening any loose connections, checking capacitors, etc., to prevent failures.
Test performance – measure temperature output, run the system in all modes to ensure the expansion valve and reversing valve function correctly.
Clean the outdoor unit – wash off the outdoor coil (especially important in dusty areas or if cottonwood fluff has clogged it in summer). Remove any debris inside the unit.
Lubricate motors (if applicable) – most are permanently lubricated, but we check fan motors for any wear.
Ensure the condensate drains are clear – flush the drain line to avoid clogs that could cause water backups.
Calibrate and test controls – make sure the remote, thermostat, or app is communicating properly and the unit responds.
This kind of preventative maintenance “significantly enhances the lifespan and efficiency” of the system. It’s also an opportunity to catch small issues (like a worn fan belt in certain models, or a slight motor noise) before they turn into major problems. Our Team Cheever techs often also give homeowners tips during these visits – like how to properly use settings or how to wash filters – which empowers you to care for the system between visits. Considering that *“qualified technicians performing biannual check-ups help maintain energy efficiency and prevent potential issues”, it’s a worthwhile investment. And remember, a well-maintained mini-split not only lasts longer, it also keeps its efficiency high, saving you money on utilities.
Lifespan Expectations: How long will a ductless heat pump last in our climate? Industry data and our experience suggest that 15 years is a typical minimum lifespan, and up to 20 years or more is quite achievable with good maintenance. This is comparable or even better than central air conditioners and many furnaces. Several factors influence lifespan: quality of the equipment (major brands tend to have longer life), usage patterns (year-round use can mean more wear than a system only used seasonally), and maintenance as mentioned. In Park City, a mini-split often works year-round (cooling in summer, heating in winter, maybe a shoulder season break), so it sees steady use. The inverter-driven design is gentle in terms of wear-and-tear compared to systems that short-cycle on and off. Still, after 15-20 years, you might start seeing components like compressor or fan motors nearing end of life. Thankfully, technology by then will likely have advanced, and you’ll have gotten two decades of service.
It’s also worth noting that our cold, dry climate is not very corrosive (unlike coastal salty air, which can corrode condensers quickly). That said, the outdoor unit in Park City does endure extreme cold and large temperature swings, which can stress components (for example, thermal expansion and contraction, or ice forming). Cold climate units are built for this, but we keep an eye on things like the condition of the coil fins, fan blades, and any rubber components. Altitude itself has a minor effect on lifespan – the slightly lower density air means the fans might work a bit harder, but nothing drastic.
Maintaining Efficiency Over Time: Over a decade or two, you want the system to remain efficient. That’s why cleaning coils and ensuring refrigerant charge is key. A dirty or undercharged system can lose 10-20% efficiency but still chug along, wasting energy. Regular service prevents that. Another tip: don’t ignore small symptoms – if you notice your mini-split isn’t heating as well in January as it did before, or it’s making a new noise, call for service. It might be something like a fan beginning to ice up or a sensor off calibration, which can be fixed to restore full function. It’s much better to address issues early than to run a struggling unit until something fails.
User Maintenance: Aside from filter cleaning, homeowners can help their mini-split live a long life by using it wisely. Avoid extreme thermostat swings (don’t constantly force it to max heat or cool – let the inverter do its job by setting a reasonable steady temperature). In very cold weather, resist the urge to crank it to 90°F – that won’t make it heat much faster, but it could force it to run full tilt unnecessarily. Instead, raise temp a few degrees at a time. Also, keep the area around indoor and outdoor units clear. Don’t block an indoor unit with a cabinet or drape. Outside, keep plants trimmed back. If you’re doing any construction or dusty activities in the home, cover the indoor units so the coils don’t get caked with drywall dust (and clean filters more often during that period).
With these practices, your mini-split heat pump will be a long-lasting, reliable part of your home’s infrastructure. Many of our clients have systems still going strong well past 15 years. And when the time does come to replace, you’ll likely do so to get even higher efficiency or newer features, rather than because the old one simply died. In essence, treat your mini-split well and it will reward you with efficient comfort for many years – through countless powder days and summer hikes alike.
A multi-zone mini-split installation on a home, showing two wall-mounted indoor units (one on the ground floor, one on the upper floor) connected to a single outdoor condenser. The refrigerant lines are neatly enclosed in a white line-hide channel running up the exterior wall. This setup allows independent climate control for different levels of the house without any ductwork, an ideal solution for older or remodeled homes where adding ducts would be impractical.  
Frequently Asked Questions (FAQ)
To wrap up, here’s a handy FAQ addressing common questions we hear from homeowners about mini-splits in the Park City and Wasatch Back area. (This section is structured for easy reference and is perfect for FAQ Schema markup for search engines.)
Q: How do mini-splits perform at high altitude?
A: In high-altitude areas like Park City (≈7,000 ft), mini-splits can lose some heating/cooling capacity due to thinner air. The decreased air density means less heat transfer per cycle, so a heat pump’s output is derated at elevation . In practical terms, a unit might output, say, ~15%–20% less BTUs at our altitude than its sea-level rating. The key is to choose the right-sized system (often one size larger than you’d pick at sea level) and use models designed to handle such conditions. Our Team Cheever technicians account for altitude in load calculations and equipment selection. With proper sizing, a quality mini-split will still perform very well at high altitude – maintaining comfortable indoor temps even on the coldest days. It’s also crucial to have it professionally installed and tuned, as proper refrigerant charge and airflow are even more important in thin air. All in all, mini-splits do work at altitude (we’ve installed hundreds in the Wasatch Back), just be sure to work with an installer who understands the derating factors. Bonus: High-altitude operation doesn’t damage the unit; it just means you need sufficient capacity. We also ensure optimal placement and settings to mitigate altitude effects – for example, we won’t undersize an outdoor unit or we might set indoor fan speeds slightly higher to move the thinner air efficiently. In short, mini-splits perform admirably in Park City’s thin air when designed and installed correctly.
Q: Are mini-splits good for vacation homes or rental properties?
A: Absolutely – in fact, mini-splits are an excellent choice for vacation cabins, second homes, or Airbnbs in this area. They offer flexibility, remote control, and energy savings that suit intermittent use. One big advantage is the ability to maintain a “vacation mode” low heat setting when the home is unoccupied. Many ductless heat pumps have a special Freeze Protection (FP) mode designed for this scenario – it keeps the indoor temperature at around 46–50°F to prevent pipe freeze without wasting energy . “Freeze Protection runs the heat on minimum power to maintain ~46 °F, extremely useful for rooms or vacation homes not in use during winter, consuming minimal energy to prevent damage.” Instead of leaving a furnace at 65°F all winter, you can set mini-splits to FP mode and rest easy knowing the house stays just warm enough. This can drastically cut heating bills for an empty home.
For rental properties, ductless systems shine by offering zoned comfort – guests can adjust the temperature in each bedroom or area to their liking, which avoids thermostat wars and improves satisfaction. You as the owner can also monitor and control the system remotely via Wi-Fi apps. For example, if a guest checks out and leaves the AC blasting, you can turn it off from your phone. Some smart controllers even allow setting min/max temperature ranges or detect when a door/window is left open and turn off the unit – great features for preventing energy waste in rentals. Also, mini-splits are generally quiet and unobtrusive, which guests appreciate (no loud clunky window AC or constant blower noise). They’re also safe – no pilot lights or combustion, reducing some safety concerns.
Another factor: many vacation homes in Park City area don’t have ductwork (e.g., an older A-frame cabin with baseboard heaters). Adding central air would be a major renovation, whereas mini-splits can be installed with minimal disturbance – perfect for upgrading the comfort of a rental without a huge construction project. They also provide AC for summer (which, while our summers are mild compared to say Phoenix, we do see 80s and 90s and guests increasingly expect air conditioning). With a mini-split, you get efficient AC and heating in one, so it’s ideal for year-round rental appeal.
Overall, mini-splits offer energy-efficient, easily controllable HVAC for part-time occupancy homes. We often install multiple zones in large vacation chalets so owners can heat just the part of the house they’ll use on a ski trip, and keep the rest in eco-mode. And with the latest tech, you’ll always know your home is safe from freezing and can make it comfy right before you or renters arrive (imagine turning the heat up to 70°F from your phone as you drive up the canyon). For these reasons, mini-splits are highly recommended for vacation homes and Airbnbs in our region.
Q: What’s the best mini-split brand for cold climates in Park City?
A: Several top-tier brands have proven themselves in cold climates. In our experience, Mitsubishi is a standout – their Hyper-Heat series units are very popular in Utah mountain communities. Mitsubishi pioneered ductless heat pumps and offers some of the “best heat pumps for cold climates”. They are known for reliability and great heating performance even when it’s well below freezing (many models work down to -13°F). Fujitsu is another excellent brand; their Halcyon XLTH line is specifically designed for low ambient heating and performs impressively in cold weather. Daikin (a global HVAC leader) has systems like the Daikin Aurora series which are built for cold climates – Daikin also tends to have very high efficiency ratings. LG produces the RED series (Reliable to Extreme Degrees) that, as mentioned earlier, can deliver full capacity at -5°F and come with factory-installed base pan heaters , making them a solid choice for Park City winters. Panasonic and Gree are also worth mentioning; Gree makes some units branded as MrCool (including DIY models) which can technically heat in very cold temps, though we typically lean towards the aforementioned brands for mission-critical performance.
In terms of “the best”, a lot depends on the specific application – but if pressed, we’d say Mitsubishi and Fujitsu are among the best for our area, with Daikin and LG close behind. These brands have reliable cold-climate track records, strong warranty support, and parts availability in the U.S. We at Team Cheever install a lot of Mitsubishi systems and have very few issues; their units have features like hot-start (no cold air blowing at start-up) and auto defrost that are well-optimized for winter. Fujitsu units often boast slightly higher HSPF ratings and have very quiet operation. Daikin, being a huge manufacturer, often offers good value for high performance. And LG is innovating on connectivity and compact designs without sacrificing cold weather performance. You really can’t go wrong with any of these top brands’ cold-climate models.
That said, proper installation and sizing by a qualified contractor is more than half the battle – the best unit will underperform if installed poorly. Our approach is to first determine the heating requirements of your home and then recommend a model (from these trusted brands) that meets those needs. We also consider things like serviceability and your specific feature preferences (e.g., some clients want a particular style of indoor unit or a specific control system – that might sway brand choice). In summary, choose a reputable brand’s cold-climate model – Mitsubishi, Fujitsu, Daikin, LG are all great – and ensure it’s installed by experienced pros. That combination is what truly yields the “best HVAC for Park City winters.”
Q: Can mini-splits be used in a hybrid system with a furnace?
A: Yes, and this approach can give you the best of both worlds. A hybrid system, also known as a dual-fuel system, means you have both an electric heat pump (mini-split) and a traditional furnace (usually gas) working together to heat your home. Many Park City homeowners do this to maximize efficiency – using the mini-split as the primary heat source, but having the furnace as a backup for extremely cold days or for parts of the home the ductless might not cover. For example, you might put mini-splits in main living areas and bedrooms, but keep your existing furnace to heat peripheral areas or to kick on if temps drop below a certain point. Modern thermostats or control systems can automate the switchover: run the heat pump when outside is above, say, 15°F, and below that, switch to furnace for raw BTU power (since gas furnaces can produce heat regardless of outdoor temp).
In retrofits of older homes, we often leave the furnace in place and add mini-splits for improved efficiency and zoning. As one zero-energy home report noted, “in retrofits, the pre-existing furnace or boiler can serve as an auxiliary system” alongside new heat pumps . This means the furnace is there as a safety net but might rarely run. In practice, with today’s cold-climate mini-splits, you’ll find the furnace hardly needs to come on except in the very coldest hours or if you want a quick blast of heat to warm up a space fast. Heat pumps provide a steadier, more even heat, whereas furnaces can raise temps quickly – having both gives you flexibility.
Technically, using both isn’t an issue – they are separate systems, so it’s not like they physically conflict. You can have a ducted furnace system and still install ductless units in specific rooms. For a more integrated approach, some people install ducted mini-split air handlers that actually tie into the furnace’s ducts (or use an air handler with electric resistance backup), but that gets complex. More commonly, the systems operate in parallel: the mini-split handles the base load, and the furnace thermostat is set lower as emergency backup. Or in a zone scenario, the mini-splits cover certain zones and the furnace covers others via its ducts.
One important consideration: control strategy. If you have a furnace and mini-split both serving the same space, you don’t want them running at the same time or fighting each other. You’d either manually turn one off when using the other or use a smart thermostat system that locks out one when the other is active. Our technicians can install controls to ensure, for example, if the mini-split can’t meet demand and the furnace kicks in, the mini-split in that zone might shut off temporarily, and vice versa. There are also third-party devices that can control a mini-split via thermostat signals if needed.
From an efficiency standpoint, this hybrid approach can really cut heating costs. For much of the winter (down to teens Fahrenheit), the heat pump will likely be more efficient (and cheaper per BTU) than burning propane or natural gas – especially if you have solar power or a good electricity rate. When it gets too cold for the heat pump to run efficiently, the furnace takes over seamlessly. This way you’re always using the most cost-effective energy source. It’s a strategy endorsed by energy departments and commonly used in cold regions. Plus, you have redundancy – if one system fails or needs maintenance, you have the other to keep you warm. So yes, you can absolutely use mini-splits in tandem with a furnace. It’s a smart, resilient setup for cold climates like ours . Just be sure to set it up with proper controls and consider engaging an HVAC pro who understands dual-fuel systems for the initial configuration.
Q: Do mini-splits work efficiently in below-freezing temperatures?
A: In a word, yes – modern cold-climate mini-splits are designed to operate efficiently well below freezing. This is a common concern because older heat pumps (from decades past) had a reputation for struggling in cold weather. However, today’s systems are a different breed. Many units we install can run at outdoor temperatures of 0°F, -5°F, or even -15°F and still provide heat. Their efficiency (COP) will naturally drop as it gets colder, but even then, they often outperform electric resistance or older systems. For example, at 30°F outside, a mini-split might have a COP of 4 (meaning 400% efficient, producing 4 units of heat per 1 unit of electricity). At 0°F, maybe that drops to COP 2 (200% efficient) – it’s lower, but still twice as efficient as electric baseboard heat which is COP 1. Some field data and manufacturer specs show COPs around 2–3 even near 0°F. One Minnesota study found COP >3 at 5°F for certain cold-climate heat pumps . That’s impressive, considering that’s well below freezing.
In terms of capacity, as discussed, good units maintain a large percentage of their heating capacity in freezing weather. It’s not unusual to see specs like “100% capacity at 5°F” – meaning the heat output doesn’t even begin to fall off until it’s 5°F or colder outside . At -13°F (which is far below freezing!), many units still can deliver ~70-80% of their rated heat . So efficiency and effectiveness remain high at temperatures that cover 99% of our winter hours. Only in extreme cold (well below design temperature) might the efficiency drop to a point where a backup heat source could supplement, but those hours are few.
Manufacturers achieve this with advanced engineering: variable speed compressors that can speed up to pump more heat, enhanced refrigerants, and control logic that optimizes defrost cycles. Defrost is one thing to note – below 32°F, especially in humid or snowy conditions, the outdoor unit will periodically go into defrost mode (it reverses and melts frost off the coil). During those few minutes, you’re not heating the house (some units ramp up indoor fans to not noticeably cool you). But defrost cycles are typically infrequent (maybe 5-10 minutes every hour or two, depending on moisture) and are factored into the performance ratings. Good units minimize defrost frequency by sensing need rather than on a fixed timer.
Our clients in Summit County routinely rely on mini-split heat pumps as the sole heat source, even on nights when it’s 10°F outside, and they report their homes are cozy and the electric bills are reasonable. If it drops to say -10°F overnight, the mini-split may run at max output continuously – and if sized correctly, it will hold temperature or maybe lose a degree or two by morning, which the sun or supplemental heat quickly recovers. But in many cases, because we slightly oversize for those extremes, the home still holds steady temp.
So, the bottom line: below freezing is the normal operating range for cold-climate mini-splits, and they do work efficiently. It’s not “too cold for a heat pump” until you’re in very extreme cold (and even then, it works, just less efficiently). As evidence, places like Canada, New England, and Scandinavia use these systems extensively in sub-freezing winters. Just ensure you select a model rated for the lowest temps you expect. If you pair that with Park City’s sunny days (solar gain helps warm houses even when air is cold) and good insulation, a mini-split will chug along efficiently all winter. To be safe, some homeowners keep a portable heater or their old furnace as backup, but often they find it’s never needed. Efficiency-wise, mini-splits remain one of the most efficient heating options in freezing weather, far surpassing traditional electric heaters and rivaling gas in cost per BTU in many cases. And of course, cooling efficiency in summer isn’t affected by cold – mini-splits excel in our mild summer conditions with SEER ratings in the 20s, making them extremely cheap to run for AC. In short, you can count on a mini-split to work through our frosty nights and snowy days, keeping you comfortable year-round.
An indoor wall-mounted mini-split unit quietly conditioning a renovated attic bedroom. Ductless units are typically installed high on the wall to distribute air evenly. They blend into the room’s design and operate almost silently, providing both heating and cooling. The lack of ductwork makes them perfect for maintaining the character of older homes while adding modern comfort – no large vents or bulkheads needed.
Team Cheever Plumbing & Heating is a locally owned HVAC expert serving Park City and the greater Wasatch Back. Contact us at (435) 252-7697 for professional mini-split installation, repair, and maintenance. Whether you’re upgrading an older home or building anew, our team delivers the gold-standard service that high-altitude homes deserve.